
OpenCode 教程:终端 AI 编程助手从入门到进阶
OpenCode 是一款开源的终端 AI 编程助手,基于 client/server 架构,提供 TUI(终端用户界面)交互,支持多 AI 提供商(Anthropic、OpenAI、Gemini 等),并内置 LSP 支持。它面向「不离开终端」的开发流程,让你在命令行里完成代码理解、编写、修改与调试。
本文从安装、配置、多 Agent 到插件,带你完整上手 OpenCode。
1. 安装
OpenCode 支持多种安装方式,选择你习惯的一种即可。
1.1 安装脚本(推荐,跨平台)
curl -fsSL https://opencode.ai/install | bash1.2 Homebrew(macOS / Linux)
brew install anomalyco/tap/opencode1.3 Node.js 生态
# npm
npm install -g opencode-ai

# yarn
yarn global add opencode-ai

# pnpm
pnpm add -g opencode-ai

# bun
bun add -g opencode-ai
安装完成后,在终端输入 opencode 即可启动 TUI 界面。
2. 快速上手
2.1 登录 AI 提供商
首次使用需要配置模型提供商的 API Key:
opencode auth login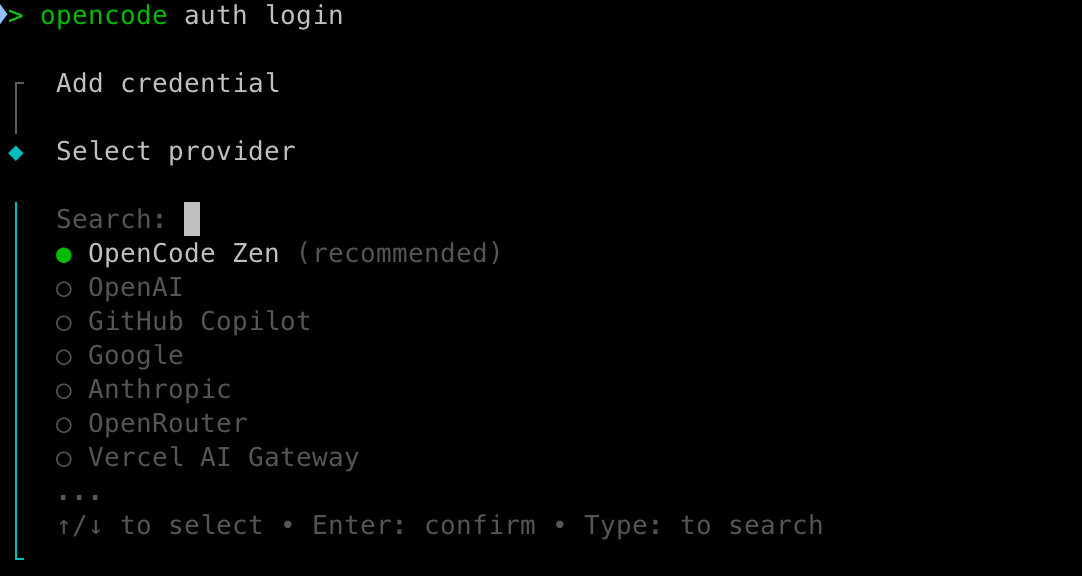
该命令会列出可用的提供商(来自 Models.dev),选择后输入 API Key。凭据默认存储在 ~/.local/share/opencode/auth.json ,也可以通过环境变量或项目内 .env 文件配置。
在 TUI 内也有对应的交互式命令:
/connect— 连接/切换提供商/models— 选择当前使用的模型
2.2 初始化项目
在项目根目录启动:
opencode使用 /init 命令可以自动生成项目级配置文件AGENTS.md。
3. 配置文件 opencode.json
OpenCode 的项目级配置写在根目录的 opencode.json (或 opencode.jsonc )中,全局配置位于 ~/.config/opencode/ 。
一个典型的配置文件:
{
  "$schema": "https://opencode.ai/config.json",
  "default_agent": "build",
  "model": "anthropic/claude-sonnet-4-5",
  "plugin": [
    "opencode-gitlab-plugin",
    "@my-org/custom-plugin"
  ]
}
关键字段:
| 字段 | 作用 |
|---|---|
default_agent | 未显式指定时使用的主 Agent |
model | 默认模型 |
plugin | 要加载的插件(npm 包名数组) |
instructions | 额外规则文件路径(支持 glob) |
agent | 自定义 Agent 定义(见下一节) |
4. 多 Agent 设置
OpenCode 支持通过 agent 字段定义多个专用 Agent,每个 Agent 可以指定不同的模型、系统提示词和工具权限。
4.1 三种模式(mode)
每个 Agent 有一个 mode ,决定它的使用方式:
primary— 主 Agent,作为会话的编排者subagent— 子 Agent,只能被其它 Agent 通过 Task 工具调用all— 既可作主 Agent 也可作子 Agent(默认值)
4.2 定义专用 Agent
{
  "$schema": "https://opencode.ai/config.json",
  "agent": {
    "code-reviewer": {
      "description": "Reviews code for best practices and potential issues",
      "model": "anthropic/claude-sonnet-4-5",
      "prompt": "You are a code reviewer. Focus on security, performance, and maintainability.",
      "tools": {
        // 禁用写文件工具,实现只读审查
        "write": false,
        "edit": false
      }
    }
  }
}
4.3 用 Markdown 定义子 Agent
除了 JSON,你还可以在 ~/.config/opencode/agents/ 目录下用 Markdown 文件定义 Agent,frontmatter 声明元信息:
---
description: Performs security audits and identifies vulnerabilities
mode: subagent
permission:
  edit: deny
---

You are a security expert. Focus on identifying potential security issues.

Look for:

- Input validation vulnerabilities
- Authentication and authorization flaws
- Data exposure risks
- Dependency vulnerabilities
- Configuration security issues
4.4 控制子 Agent 的调用权限
通过 permission.task 的 glob 模式,精确控制一个编排 Agent 可以调用哪些子 Agent:
{
  "agent": {
    "orchestrator": {
      "mode": "primary",
      "permission": {
        "task": {
          "*": "deny",
          "orchestrator-*": "allow",
          "code-reviewer": "ask"
        }
      }
    }
  }
}
以上配置表示: orchestrator 默认不能调用任何子 Agent,但可以调用 orchestrator-* 前缀的 Agent,调用 code-reviewer 时需要询问用户确认。
5. 插件安装
OpenCode 的插件是 JavaScript/TypeScript 模块,可以 hook 进事件系统来扩展功能、添加自定义工具和集成。
5.1 命令行安装
# 完整命令
opencode plugin <module>

# 别名
opencode plug <module>

# 全局安装
opencode plug --global <module>
5.2 配置方式
也可以在 opencode.json 的 plugin 数组中直接声明 npm 包名:
{
  "$schema": "https://opencode.ai/config.json",
  "plugin": [
    "opencode-helicone-session",
    "opencode-gitlab-plugin"
  ]
}
5.3 常用插件
| 插件 | 功能 |
|---|---|
opencode-helicone-session | Helicone 会话追踪与观测 |
opencode-gitlab-plugin | GitLab API 工具集成 |
opencode-skills | 自动发现并注册 Skills 为动态工具 |
@tarquinen/opencode-dcp | DCP 动态上下文剪枝,自动清理对话中过期的工具输出,节省 token |
opencode-gemini-auth | 复用 Gemini CLI 的 OAuth 登录凭据,免去重复认证 |
opencode-antigravity-auth | Google Antigravity IDE OAuth 认证,用 Google 凭据访问 Gemini 3 Pro / Claude 4.6 |
oh-my-openagent | 多模型编排 + 并行后台代理 + LSP/AST 工具的 batteries-included 插件套件 |
下面是我本机 ~/.config/opencode/opencode.json 中实际启用的一组插件,可作为参考:
{
  "$schema": "https://opencode.ai/config.json",
  "plugin": [
    "@tarquinen/opencode-dcp@latest",
    "opencode-gemini-auth@latest",
    "opencode-antigravity-auth@latest",
    "[email protected]"
  ]
}
各插件说明:
@tarquinen/opencode-dcp(github.com/Opencode-DCP/opencode-dynamic-context-pruning):DCP 即 Dynamic Context Pruning,通过剪枝对话上下文里已过时的工具输出(tool output)来优化 token 用量,降低长会话的成本与噪声。opencode-gemini-auth(github.com/jenslys/opencode-gemini-auth):让 OpenCode 直接复用 Gemini CLI 的 OAuth 登录态,配合@ai-sdk/google使用 Google 模型时无需再单独跑opencode auth login。opencode-antigravity-auth(github.com/NoeFabris/opencode-antigravity-auth):Google Antigravity IDE 的 OAuth 认证插件,用 Google 凭据访问 Gemini 3 Pro、Claude 4.6 等模型。oh-my-openagent(github.com/code-yeongyu/oh-my-openagent):功能最全的「全家桶」套件,详见下一节。
5.4 oh-my-openagent 详解
oh-my-openagent(简称 OmO,口号 "The Best AI Agent Harness")是一个 batteries-included 的 OpenCode 插件套件,核心能力:
- 多模型编排:一个会话内可在多个 provider(DeepSeek、Gemini、Claude、本地 Ollama 等)间路由,按任务难度分配不同模型。
- 并行后台代理:内置
oracle(高 IQ 只读顾问)、librarian(外部文档/仓库检索)、explore(代码库 grep)等子代理,可并行后台运行。 - LSP/AST 工具:封装
lsp_*(跳转、引用、诊断、重命名)与 AST 级代码工具,编辑前先看符号结构与影响面。 - Team Mode:创建并管理并行代理团队协作。
- Skills:附带
init-deep(生成层级化 AGENTS.md)、security-research(安全审计)等技能。
安装后额外提供命令行入口 omo(等价于 oh-my-opencode / oh-my-openagent)。锁定版本可写死,如 "[email protected]",也可以 @latest 跟随最新。
6. 常用 Slash 命令
在 TUI 中,输入 / 可以访问内置命令:
| 命令 | 作用 |
|---|---|
/help | 显示帮助 |
/connect | 连接提供商 |
/models | 切换模型 |
/init | 初始化项目配置 |
/compact | 压缩上下文 |
/export | 导出会话 |
/share / /unshare | 分享 / 取消分享会话 |
/sessions | 查看会话列表 |
/new | 新建会话 |
/themes | 切换主题 |
/thinking | 切换思考模式 |
/undo / /redo | 撤销 / 重做 |
/editor | 打开编辑器 |
/exit | 退出 |
7. 自定义命令与规则
7.1 自定义命令
在 opencode.jsonc 中用 command 字段定义快捷命令:
{
  "$schema": "https://opencode.ai/config.json",
  "command": {
    "test": {
      "template": "Run the full test suite with coverage report and show any failures.\nFocus on the failing tests and suggest fixes.",
      "description": "Run tests with coverage",
      "agent": "build",
      "model": "anthropic/claude-sonnet-4-5"
    }
  }
}
定义后在 TUI 中输入 /test 即可触发。
7.2 AGENTS.md 规则文件
OpenCode 支持类似 Cursor Rules 的 AGENTS.md 文件,用于为特定项目注入自定义指令。这些指令会被包含进 LLM 的上下文中,从而定制其在项目中的行为。
在 opencode.json 中通过 instructions 字段指定规则文件路径(支持 glob):
{
  "$schema": "https://opencode.ai/config.json",
  "instructions": [
    "docs/development-standards.md",
    "test/testing-guidelines.md",
    "packages/*/AGENTS.md"
  ]
}
7.3 /init-deep 生成层级化 AGENTS.md
除了手写 AGENTS.md,OpenCode 还提供了 /init-deep 命令,自动为项目生成层级化的 AGENTS.md 知识库:在项目根目录创建总纲,并在复杂度较高的子目录按需生成专属 AGENTS.md,让子模块的规则就近维护。
/init-deep                      # 更新模式:增量修改已有文件 + 在需要处新建
/init-deep --create-new         # 重建模式:读取现有内容后全部删除,从零重新生成
/init-deep --max-depth=2 # 限制扫描的目录深度(默认 3)工作流程:
- 发现与分析(并发)— 派发 explore 子代理并行扫描项目结构、入口、约定、反模式、构建/CI 与测试模式;主会话同步做 bash 结构分析、读取已有
AGENTS.md、用 LSP/codegraph 构建代码地图。 - 评分与决策 — 按「文件数 / 子目录数 / 代码占比 / 模块边界 / 符号密度 / 引用中心度」等维度为每个目录打分,决定哪些目录值得单独放一个
AGENTS.md(根目录必定生成;高分目录单独生成;低分目录跳过由父级覆盖)。 - 生成 — 先写根
AGENTS.md,再并行生成各子目录的AGENTS.md。 - 审查去重 — 去除通用建议、删除与父级重复的内容、精简到合适篇幅。
生成的根 AGENTS.md 通常包含:概览、目录结构、代码地图(符号/类型/位置/引用数)、项目特有约定、本项目禁用的反模式、常用命令、易踩坑点等。子目录 AGENTS.md 只保留与父级不同、且专属于该模块的内容,避免冗余。
提示:
/init-deep生成的是面向「未来 Agent 会话」的项目知识库,适合中大型、结构复杂的仓库;小项目用/init生成单个AGENTS.md即可。
8. 小结
OpenCode 的核心优势在于:纯终端操作、多 Agent 编排、插件生态和多提供商支持。通过 opencode.json 统一管理 Agent、插件与规则,配合 AGENTS.md 固化项目规范,可以构建一套高度定制化的 AI 编码工作流。
更完整的配置项请参考官方文档:https://opencode.ai/docs。